Over time, headlight lenses can discolour or dull due to environmental factors such as road debris, rain, UV light or contact with caustic chemicals. When the factory protective hard coat breaks down with UV degradation and wear from abrasion, the untreated lens will eventually develop small surface cracks, known as crazing. They also eventually discolour through the thickness of the lens, which can significantly reduce the efficiency of light output measured in lux. As a result, hazy lenses may reduce nighttime visibility, putting all road users at risk.
Norton offers a complete Headlight Repair Kit containing all the products needed to remove scratches and renew a clear surface on worn headlights.
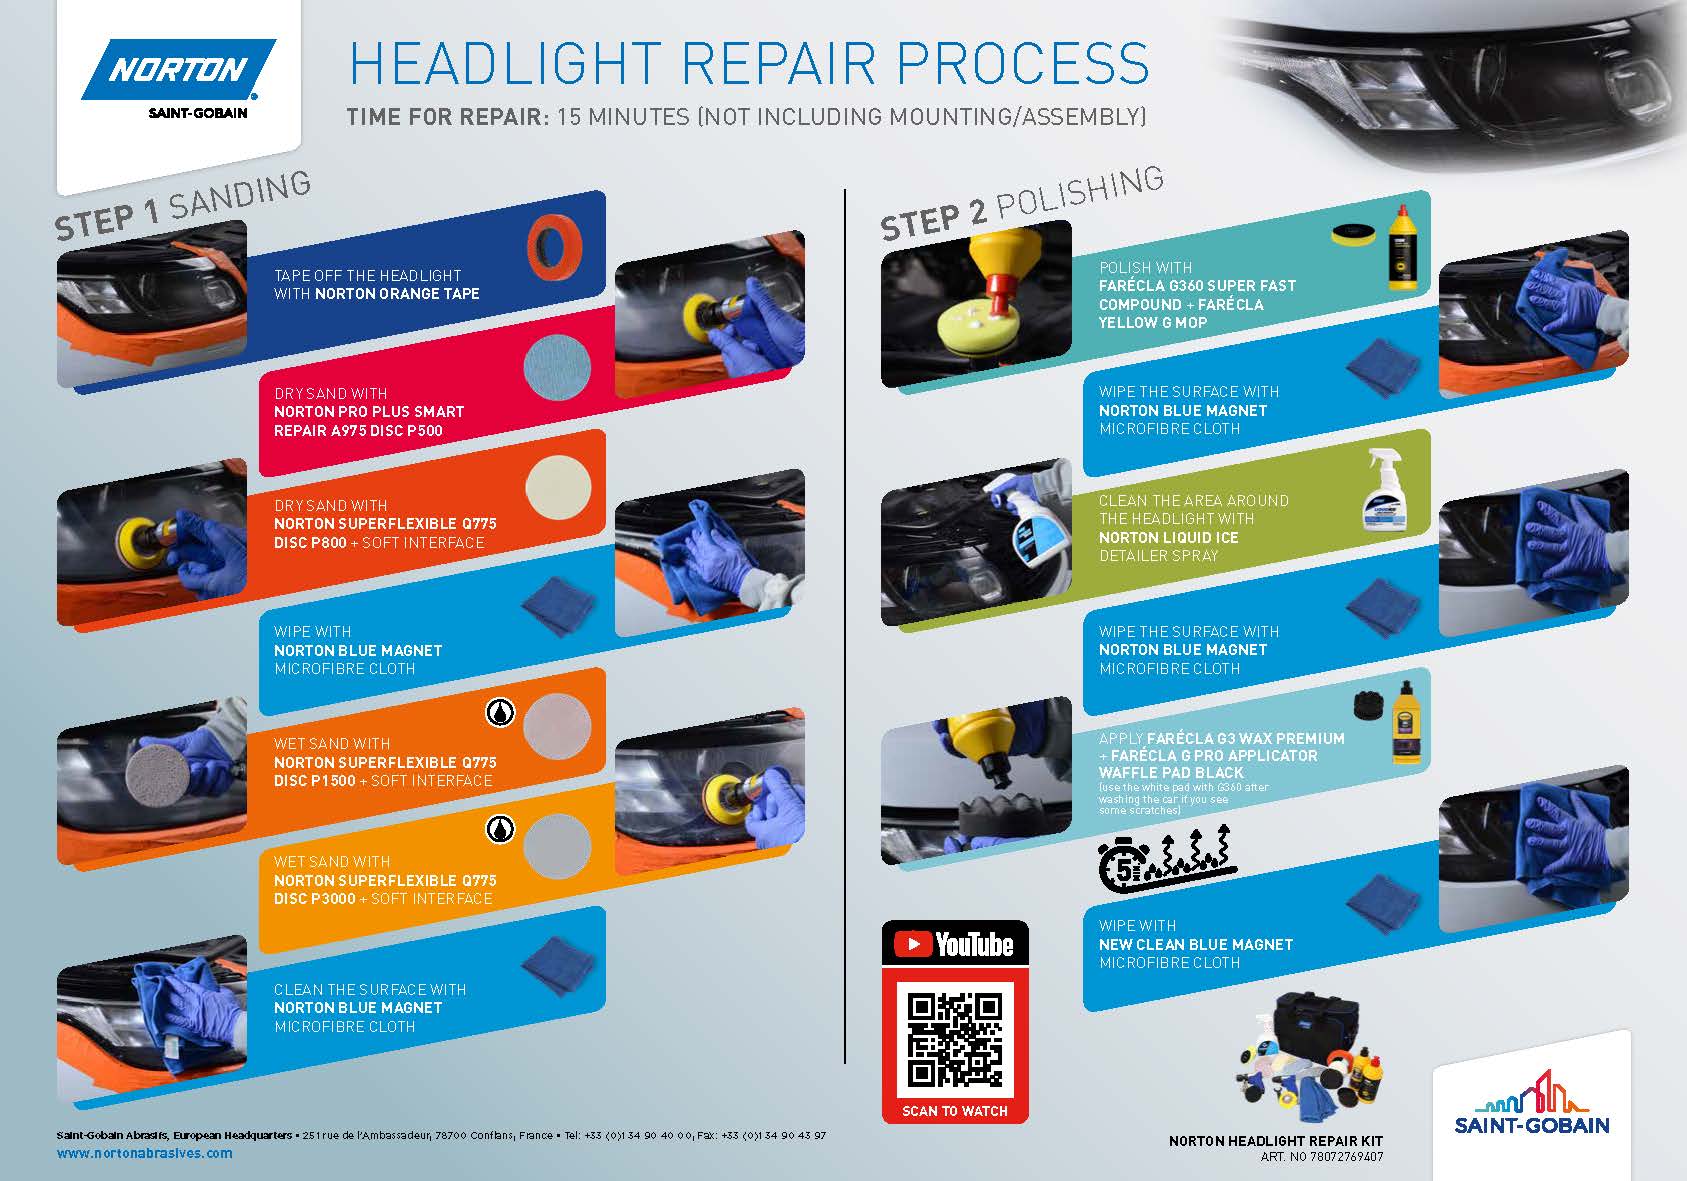
Headlight restoration in 10 simple steps with the Norton Kit
Before sanding the headlight, clean the area with car soap and water to remove dust and contaminants. Tape off the headlight with Norton Orange Tape to protect the rest of the car from accidentally sanding the paint or trim. Expert tip: For HARD contamination, use the Norton clay disc and clean the surface properly before sanding.
Start by dry sanding the area with NORTON PRO PLUS SMART REPAIR A975 P500 on a 75mm dual-action sander. These discs contain a No-Fil® coating to prevent the build-up of dust and premature clogging. Expert tip: If the disc has visible white remarks, change it to a new one.
Once the yellowish or deeper scratches are removed, replace the disc with a NORTON SUPERFLEXIBLE Q775 DISC P800 with a soft interface. Expert tip: Make sure to remove all the P500 sanding scratches.
Wipe the headlight with the blue magnet cloth to remove dust particles and contaminants from sanding.
Dampen the surface and begin wet sanding with the NORTON SUPERFLEXIBLE Q775 DISC P1500. Expert tip: Make sure to remove all the P800 sanding scratches. Norton Superflexible discs are made with No-Fil® coating and flexible backing and deliver excellent cutting performance with added flexibility and conformability for a fast and uniform finish.
As the headlight becomes clearer, it is ready to wet sand with the NORTON SUPERFLEXIBLE Q775 DISC P3000. These fine grit discs are ideal for polishing out even faster in spot repair applications, thanks to the uniform cut, smooth finish and lower scratch depth.
Wipe the headlight with the blue magnet cloth before you go to polishing. Apply only a few drops of FARÉCLA G360 SUPER FAST COMPOUND with FARÉCLA YELLOW G MOP on a 76mm mini polisher. Expert tip: Wipe the surface and check it under the light. Repeat the operation if needed.
Clean up the area around the headlight with NORTON LIQUID ICE DETAILER SPRAY.
Once again, wipe the surface with our blue magnet cloth and apply FARÉCLA G3 WAX PREMIUM. For best results, use the G PRO BLACK APPLICATOR WAFFLE PAD. Expert tip: Apply the wax evenly first in a horizontal, then vertical direction. Make sure that the entire surface gets covered.
NOW WAIT 5 MINUTES Do not touch the waxed area!
To complete the process, wipe the whole surface with a new clean blue magnet microfibre cloth.
The Headlight restoration process with Norton Kit is quick and takes less than 15 minutes (not including mounting and assembly).
Headlight restoration, if done right, extends the usable life of the headlight assembly. If necessary, the process can be repeated and is considerably more economical and environmentally friendly than the disposal and replacement of headlights. Thus, it allows for reducing overall landfill and microplastic usage.